Managing Assets & Replacing Media:
Users can upload a video to replace a current video in My Media. The newly uploaded video replaces the original media in My Media and would be published everywhere the original video is published.
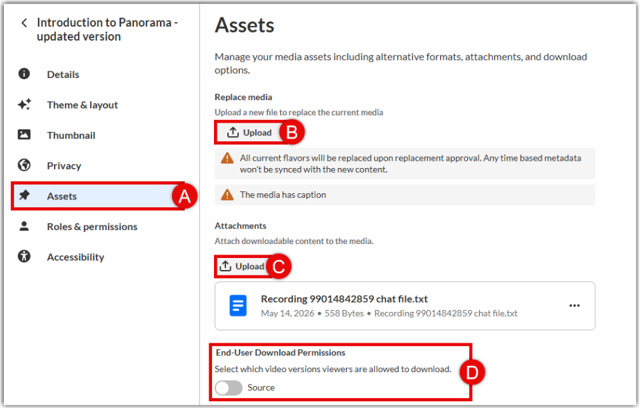
- Click the Assets (A) tab from the left sidebar menu.
- Replace media: Click the Upload (B) button to select and upload a new file to replace the current media.
- Toggle the End-User Download Permissions Source (D) switch to allow or prevent viewers from downloading video versions.
- Attachments: Click the Upload (C) button to open the attachment dialog window:
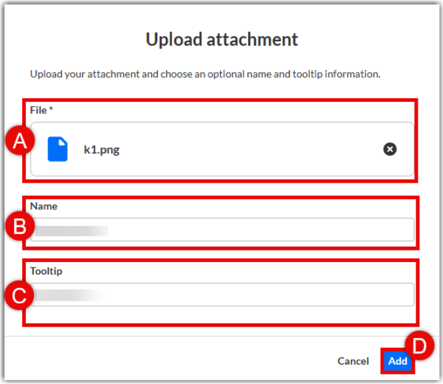
- Select the File (A) to upload.
- Enter an optional Name (B) for the attachment.
- Enter optional Tooltip (C) information.
- Click Add (D) to attach the file.
Video Editor:
Kaltura provides a media editor that allows users to trim and split, delete and fade in/out. Changes can be made to the original or can be applied to a copy of the original media. Follow the directions below to access the media editor and make edits.
Note for users of screen readers: Letters in parentheses in the instructions below refer to corresponding areas on example images. If you have any questions about these instructions, contact the Office of Learning Technologies for assistance opens a new website.
Launch Video Editor:
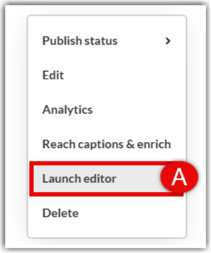
From the main media page, click the three dots menu icon and select Launch editor (A) from the dropdown list.
Video Editor Window Layout:
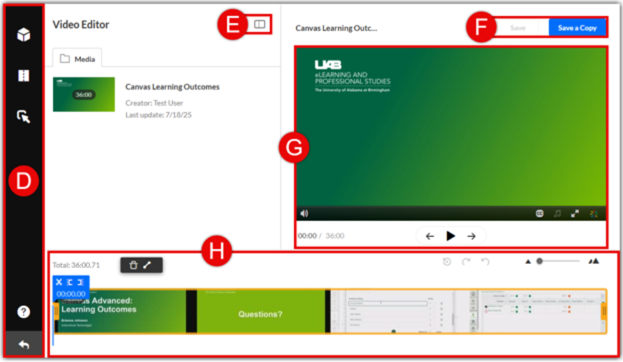
- The Left Navigation (D) bar has options to toggle video editor/Quiz editor, get help, and exit editor.
- The left pane displays media details and can collapse by clicking the open/close left pane (E) button.
- Save (F) options are on the top right.
- The Media Player (G) and playback buttons are used to preview timeline modifications.
- The Timeline (H) is at the bottom and provides options to modify media.
Trim Media :
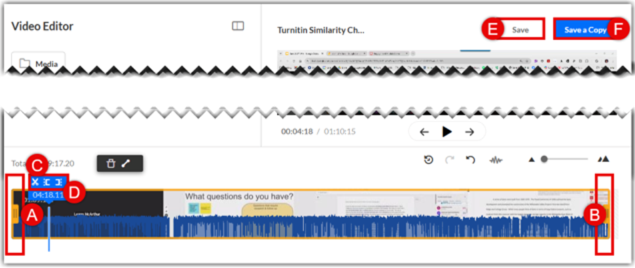
The trimming tool allows you to shorten your video by setting new start and end points using either the handlebars or the blue timeline marker.
- Navigate to My Media in Canvas or at mediaspace.uab.edu.
- Locate your video and click the pencil Edit (A) icon (or select Actions ------> Edit).
- Click the Launch Editor (B/C) button on the far right.
- Choose one of the following methods:
Method A (Handlebars):
- Click and drag the Left Yellow Handlebar (A/C) to the desired start time. The shaded gray region (D) indicates the area being removed from the beginning.
- Click and drag the Right Yellow Handlebar (B/E) to the desired end time. The shaded gray region (F) indicates the area being removed from the end.
Method B (Precision Marker):
- Move the Blue Timeline Marker to your desired start position and click the Set In (C) icon to delete everything to the left.
- Move the marker to your desired end position and click the Set Out (D) icon to delete everything to the right.
- The Save (E) button permanently updates and overwrites the original media file everywhere it is published.
- The Save a Copy (F) creates a brand-new media entry with your trimmed changes while leaving the original video untouched in your My Media repository.
Split, Delete and Fade In/Out:
Users can split or cut the timeline into sections and delete desired sections from the timeline. Users can then add fade in/out effects to transition from one section on the timeline to another. Follow the directions below.
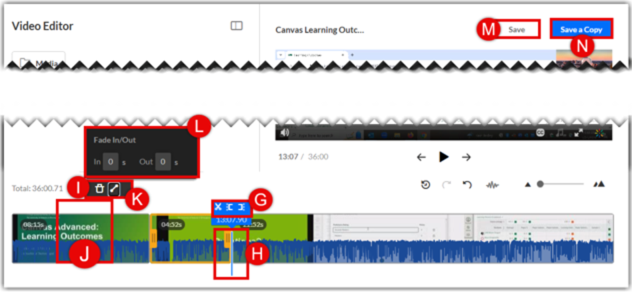
- Move the blue Timeline Marker (G) to the starting location of the piece of video you want to remove and click the Split (H) icon to cut the timeline at that point. Repeat for the end of section of video.
- Click the section that is to be removed to select it and click the Delete (I) icon.
- The Gray Area (J) will automatically be skipped. Do NOT attempt to drag the sections together.
- Select a section of the remaining video and click the Fade in/out (K) icon.
- Input the desired amount of seconds of fade in/out (L) in the dialog box. Fade icons will appear to show which sections have fade in/out applied.
- Click Save (M) to make these changes to the original media or click Save a Copy (N) to save the changes to a copy of the media with the original media left unchanged.
Delete Media:
Users can delete media from the Kaltura My Media account.
Note: The recycle bin retention period (the number of days items remain in the recycle bin before being permanently deleted) is configured by Kaltura account management. Deleted media can be restored from the Recycle Bin during the retention period. To restore deleted media, go to My Recycle Bin, locate the media item, and click Restore. The media will return to its original location.
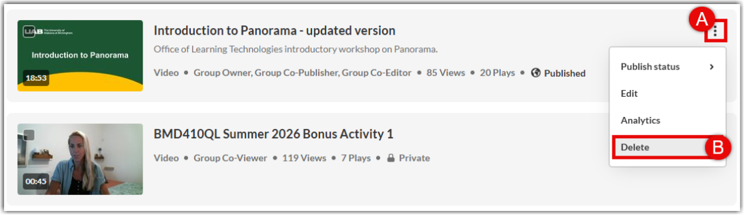
- On the My Media page, locate the video you want to remove and click the three dots menu (A) on the far right.
- Select Delete (B) from the dropdown options to remove the media.