This article covers managing, uploading and editing caption and extended audio description files for Kaltura media.
All videos uploaded into Kaltura (My Media/Media Gallery) after January 3, 2022 are automatically captioned with English auto-generated machine captions. If you have media content that was uploaded to Kaltura before this date, you can order auto-generated machine captions yourself using the instructions below. These instructions can also be used if captions for a source language other than English is needed.
Kaltura supports uploading & editing SRT, XML, DFXP and VTT caption files, in addition to supporting machine generated captions. Kaltura supports creation and editing of EAD using the same tooling. Machine captions have been automatically generated for media uploaded to Kaltura since January 2022. Users can order machine captions for a single video or for multiple videos in My Media if there are no existing captions. These machine captions are around 85-95% accurate, though they must be edited after the caption process is complete for full compliance with Title II. Once the machine caption request is completed (usually 1-24 hours), the captions will automatically be present on the requested media. The automatic machine captions can be replaced with an uploaded version if desired.
Note for users of screen readers: Letters in parentheses in the instructions below refer to corresponding areas on example images. If you have any questions about these instructions, contact the Office of Learning Technologies for assistance opens a new website.
Upload Captions & Extended Audio Descriptions
Kaltura supports uploading a caption file created in another system in addition to creating empty caption or EAD files to be built out in the Kaltura editor. Both functionalities are available in the Kaltura Edit menu’s Accessibility section.
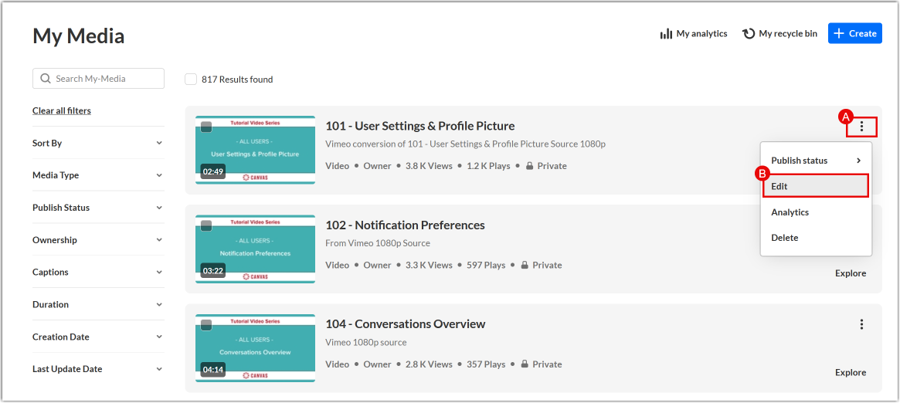
- Access My Media in Canvas or MediaSpace outside of Canvas, locate the desired video, and click the vertical kabob (A). Click Edit (B) to open the media’s Edit menu.
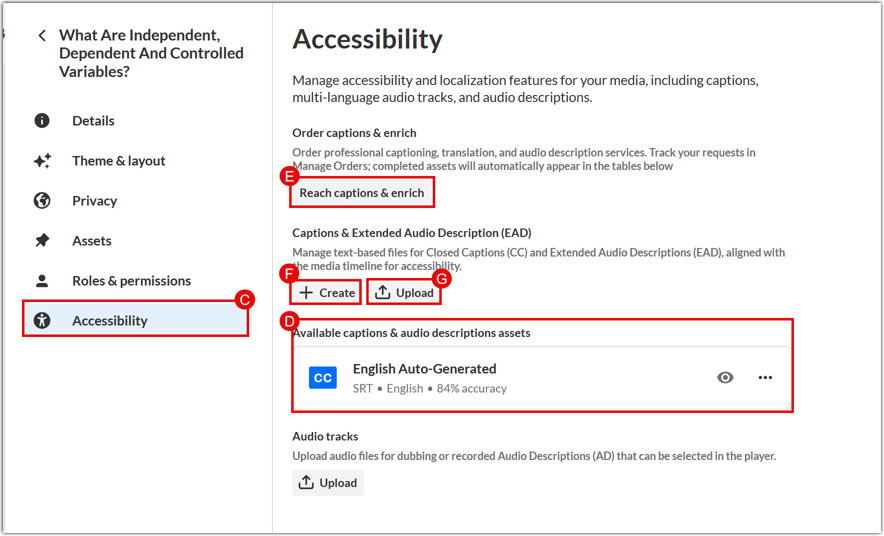
- In the left-hand menu, click Accessibility (C). Here you can view current accessibility files, order machine captions, create caption or EAD files, upload caption or EAD files and edit caption or EAD files.
- Entries under Available captions & audio description files (D) are existing caption and extended audio description files associated with this media entry. If there is already a machine generated caption file, Skip to Manage & Edit Captions below for more information on managing these files.
- To order machine generated caption files, select Reach captions & enrich (E). Extended Audio Descriptions cannot be ordered at this time. In the resulting dialogs, Click +order then Order again as described in the ordering process above.
- To upload an existing caption or EAD file created in another program that is stored on your computer, select Upload (E) then choose the type of file – either Closed Captions (F) or Extended Audio Description (G). Skip to step 3.
- To create an empty caption or EAD file to build out in the Kaltura caption or EAD editor, choose +Create (F). Skip to step 4.
- To modify an available existing caption or extended audio description file, select the horizontal kabob (H). To edit the label, language and estimated percentage accuracy of the caption/EAD file, select Edit details (I). To edit the textual contents of the caption file along with timestamps for the captions appearing on-screen, choose Launch editor (J).
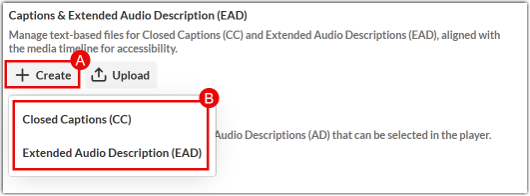
- Creation of empty caption or EAD files to build out using the Kaltura editor only differs by the dialog’s title and supported file types. Choose +Create (A) to select a file on your computer to upload, then choose Closed Captions (CC) or Extended Audio Description (EAD) (B).
- Enter a Label (C) for the file in the Kaltura system into the Label (H) field. The Label will be shown to viewers of the content as the name of the caption or EAD. Please follow the guidelines below regarding caption and EAD file names:
- Kaltura machine captions are auto-labeled to [Language] Auto-Generated
- User reviewed and edited captions labeled [Language] CC
- Professional captions labeled with [Language] [type of caption] Professional
- User produced extended audio descriptions be labeled with [Language] Auto-Voiced EAD
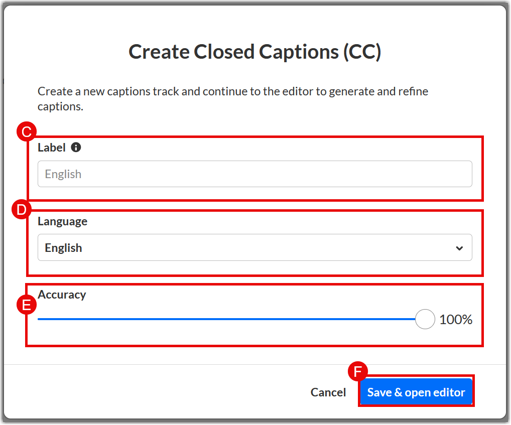
- When uploading captions or EAD the dialog only differs by title and supported file types. Extended audio descriptions support only VTT file types, while SRT, XML, DFXP and VTT file types are supported as closed caption files. Choose +Upload (A) followed by either Closed Captions (CC) or Extended Audio Description (EAD) (B).
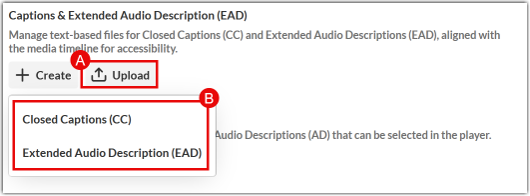
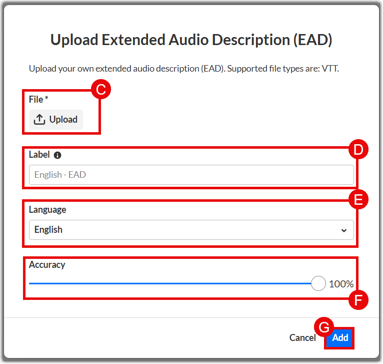
- Upload (C) will open a system dialog allowing you to choose the file to upload to Kaltura as caption or EAD file. Enter a Label (D) for the file in the Kaltura system into the Label (H) field. Please follow the guidelines below regarding caption and EAD file names:
- Kaltura machine captions are auto-labeled to [Language] Auto-Generated
- User reviewed and edited captions labeled [Language] CC
- Professional captions labeled with [Language] [type of caption] Professional
- User produced extended audio descriptions be labeled with [Language] Auto-Voiced EAD
Manage Captions
Once caption files/extended audio descriptions are created or uploaded to a media entry, they appear under Available captions & audio descriptions assets on the Accessibility section of Edit details.
- Access My Media in Canvas or MediaSpace outside of Canvas, locate the desired video, and click the vertical kabob (A). Click Edit (B) to open the media’s Edit menu.
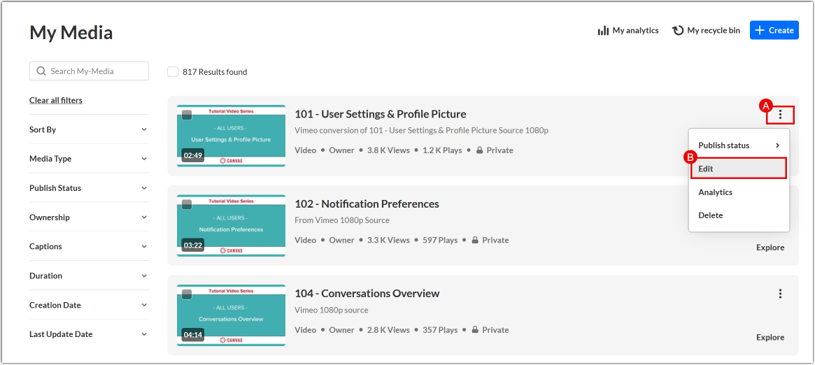
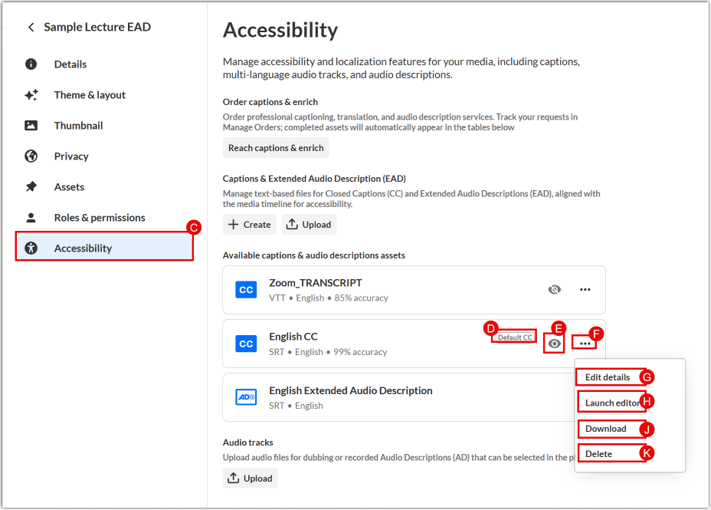
- Choose Accessibility (C) to view caption and EAD files associated with the media entry listed under Available captions & audio description assets.
- The Default CC (D) is the caption file displayed when viewers turn on captions. This should be the most accurate caption file associated with the media.
- The Show/Hide (E) icon determines if the caption or EAD file is an option for users on the player. Hiding a caption file prevents media viewers from using that caption file. Toggle this icon between a barred/unbarred eye to hide/show the caption file for viewers.
- The Horizontal more kabob (F) shows more options.
- Edit details (G) opens a dialog where you can change the caption’s label, language and accuracy percentage.
- Launch Editor (H) opens the caption/EAD editor where the contents of the file are shown on screen to be edited. Skip to step 3 for information on using the CC/EAD Editor.
- Download (J) allows you to download a copy of the caption or EAD file.
- Delete (K) removes the caption/EAD file completely.
Edit Captions
Users can edit their captions for accuracy. Learn how to edit captions or request professional caption editing on behalf of a student with an accommodation.
How to Edit Captions
Captions can be added, edited, or deleted from media. Follow the directions below.
-
-
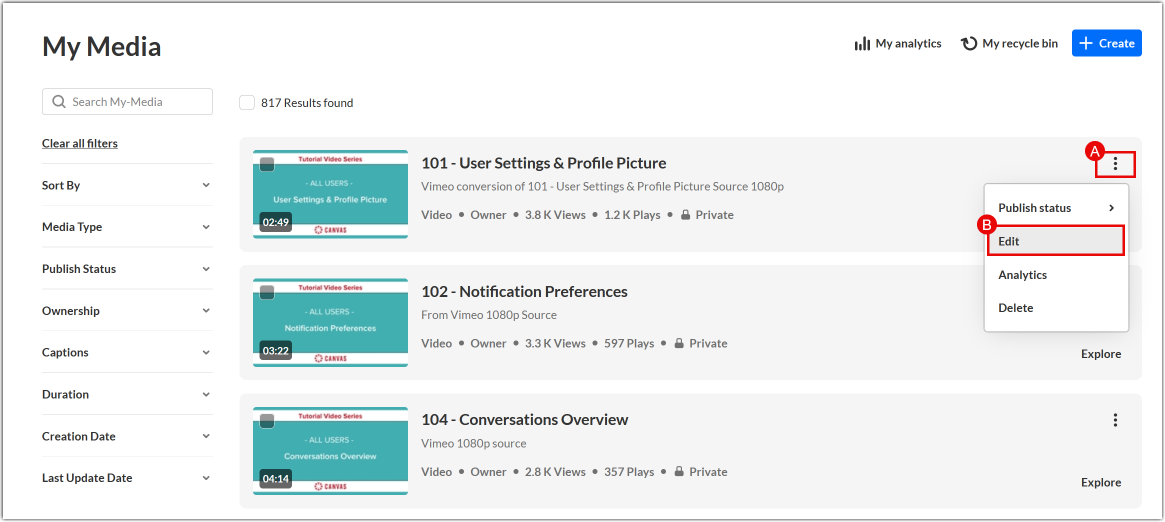
- Access My Media from Canvas or the Content Hub website. Find your media, and click Edit (B) to see the Edit menu options (A) for a desired video.
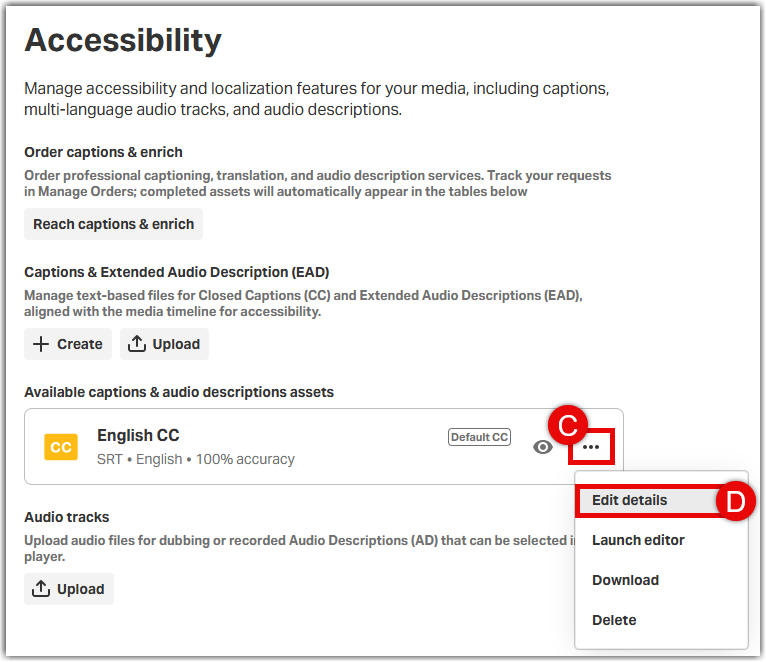
- Click the three dots icon (C) next to the caption file and select Edit details (D) to open the Edit caption window.
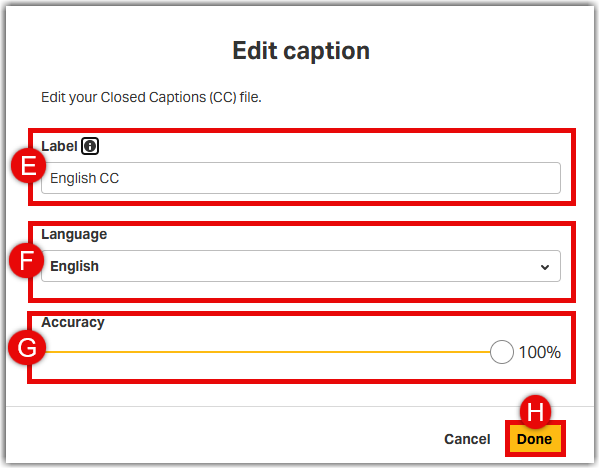
- In this window, update the Label (E) or Language (F) as needed, and adjust the Accuracy (G) rating. Human-adjusted machine captions are usually 96-99% accurate after text has been corrected, speaker names and sound cues are added to the caption file.
- Click Done (H) to save your changes, or Cancel to discard them.
- Access My Media from Canvas or the Content Hub website. Find your media, and click Edit (B) to see the Edit menu options (A) for a desired video.
-
Captions Editor
Once Edit Captions has been clicked, a web-based captions editor will appear.
-
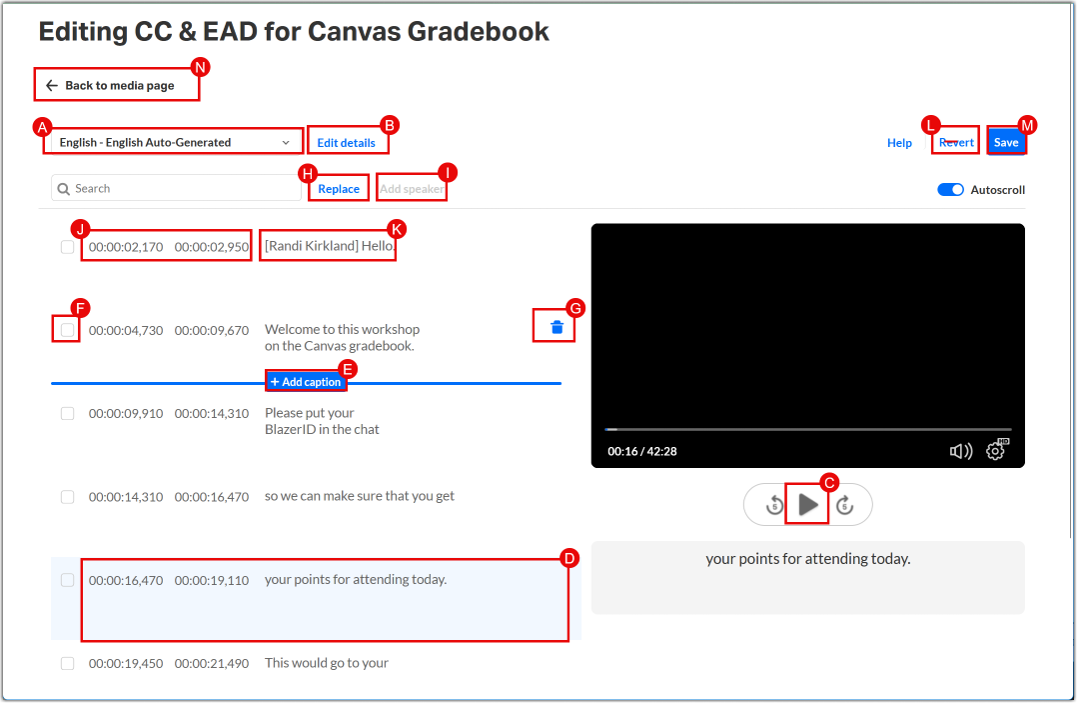
- The web-based Kaltura Editor for CC & EAD files allows editing of the caption or extended audio description file. The functionality works the same for caption files and extended audio description files.
- Filename of the current file being edited is shown in the picker (A). Click the drop-down to change to another caption or EAD file associated with this media entry.
- Edit details (B) opens a dialog where you can change the caption’s label, language and accuracy percentage. Human-adjusted machine captions are usually 96-99% accurate after text has been corrected, with speaker names and sound cues are added to the caption file. A human-adjusted machine caption file should be labeled to [Language] CC, with English-language captions labeled English CC.
- Press play (C) for the video to start. The editable section of the caption file shown on the player will have a light blue highlight on the edit screen (D).
- Hover the cursor over a caption block to show the option to +Add caption (E) block below the current caption block, Delete (G) the caption block or select (F) the current caption block.
- Replace (H) allows for replacing all instances of a matched word with another.
- When a caption block is selected, Add Speaker (I) can be used to add a speaker’s name at the start of each selected caption.
- Start and end timestamps (J) of a caption block in hh:mm:ss,mmm. To edit the start or end time of a caption block, select the timestamp and type. To edit the content of a caption block (K), select the text and type.
- Revert (L) rolls the file back to the last saved state.
- Save (M) saves your changes.
- When done editing, use Back to media page to return to your video.